In today’s world, keeping a copy of data is very important. Without a data backup, resuming operations can be challenging, and starting from scratch may result in data loss or prolonged downtime. So that you should keep a copy of the data. This process is also known as replication. In this blog, we will discuss replication concepts on MongoDB servers.
What is MongoDB replication?
MongoDB replication is a method for ensuring data redundancy and high availability by creating copies of the dataset across multiple MongoDB servers, typically configured as a replica set.
How Replication is works ?
In MongoDB one of the node is considered the primary node that receives all the write operations.The other node are the secondary, it will replicate the data from the primary node.

In an event where the primary node is unavailable , a secondary node will take up the primary node role.
Heartbeat
It is the process that identifies the current status of MongoDB node in a replica set.The replica set nodes send pings to each other every two seconds.If any node ping back within 10 seconds,the other nodes in the replica set mark it as inaccessible.
Working principle
- Write operations on the primary: When a user sends a write operation (such as an insert, update, or delete) to the primary node, the primary node processes the operation and records it in its op-log (operations log).
- Op-log replication to secondaries: Secondary nodes poll the primary’s op-log at regular intervals. The op-log contains a chronological record of all the write operations performed. The secondary nodes read the op-log entries and apply the same operations to their data sets in the same order they were executed on the primary node.
- Achieving data consistency: Through this op-log-based replication, secondary nodes catch up with the primary’s node data over time. This process ensures that the data on secondary nodes remains consistent with the primary’s node data.
- Read operations: While primary nodes handle write operations, both primary and secondary nodes can serve read operations which can help in load balancing. Clients can choose to read from secondary nodes, which helps distribute the read load balance and reduce the primary node’s workload. However, note that secondary node might have slightly outdated data due to replication lag.
Types of replications
- Replica Sets : This is the primary replication mechanism in MongoDB, a replica set consists of a group of MongoDB instances that maintain the same dataset.It has one primary node and multiple secondary nodes .If the primary node fails, an election takes place to promote one of the secondaries to primary.
- Sharded Clusters with Replication : This is a combination of sharding and replica sets. Each shard in the cluster is a replica set.MongoDB splits data across multiple shards based on a shard key. Each shard consists of a replica set for redundancy and high availability.The main purpose of a cluster is to support extremely large data sets and high throughput operations by horizontally scaling the workload.
The major difference between a replica set and a shard is:
In a replica set, all nodes contain the full dataset for redundancy, while a sharded cluster distributes portions of data across shards to allow horizontal scaling and improved performance for large data sets.
Minimum requirements for replication
Replica Set : The minimum recommended configuration for a replica set is a three member replica set with three data-bearing members: one primary and two secondary members.A replica set can have up to 50 members but only 7 voting members.
Sharded Cluster: The minimum configuration for a sharded cluster is a one MongoDB instance acting as a query router, a single shard replica set (one primary and two secondary), and a replica set config server with a minimum 3 member replica set.
Steps for Configure Replication
1.Install the mongod
2.Configure the /etc/hosts and /etc/mongod.conf
3.Configure the firewall
4.Configure MongoDB replica set
5.Initiate replication
6.Test the replication
For testing locally, I need two virtual machines (VM). So that first I try to create the two VM’s using the vagrant tool.
What is Vagrant ?
Vagrant is a tool for building and managing virtual machine environments in a single workflow. With an easy-to-use workflow and focus on automation, Vagrant lowers development environment setup time, increases production parity.
vagrant box : Boxes are the package format for Vagrant environments.
1.Install the mongod
For testing purpose i choose the two Vagrant Boxes (Ubuntu 22.04 version) and install the MongoDB community edition 7.0 version.
Step 1:
Import the public key used by the package management system
> sudo apt-get install gnupg curlImport the MongoDB public GPG key
> curl -fsSL https://pgp.mongodb.com/server-7.0.asc | sudo gpg -o /usr/share/keyrings/mongodb-server-7.0.gpg --dearmorStep 2:
Create a list file for mongodb under the etc/apt/sources.list.d/mongodb-org-7.0.list.
> echo "deb [ arch=amd64,arm64 signed-by=/usr/share/keyrings/mongodb-server-7.0.gpg ] https://repo.mongodb.org/apt/ubuntu jammy/mongodb-org/7.0 multiverse" | sudo tee /etc/apt/sources.list.d/mongodb-org-7.0.listStep 3 :
Reload local package database.
> sudo apt-get updateStep 4 :
Install the latest version of mongodb packages
> sudo apt-get install -y mongodb-orgTo start the MongoDB Service,
Start the Mongod service using the systemctl command.
> systemctl start mongodTo verify the mongod process is running or not.
> systemctl status mongod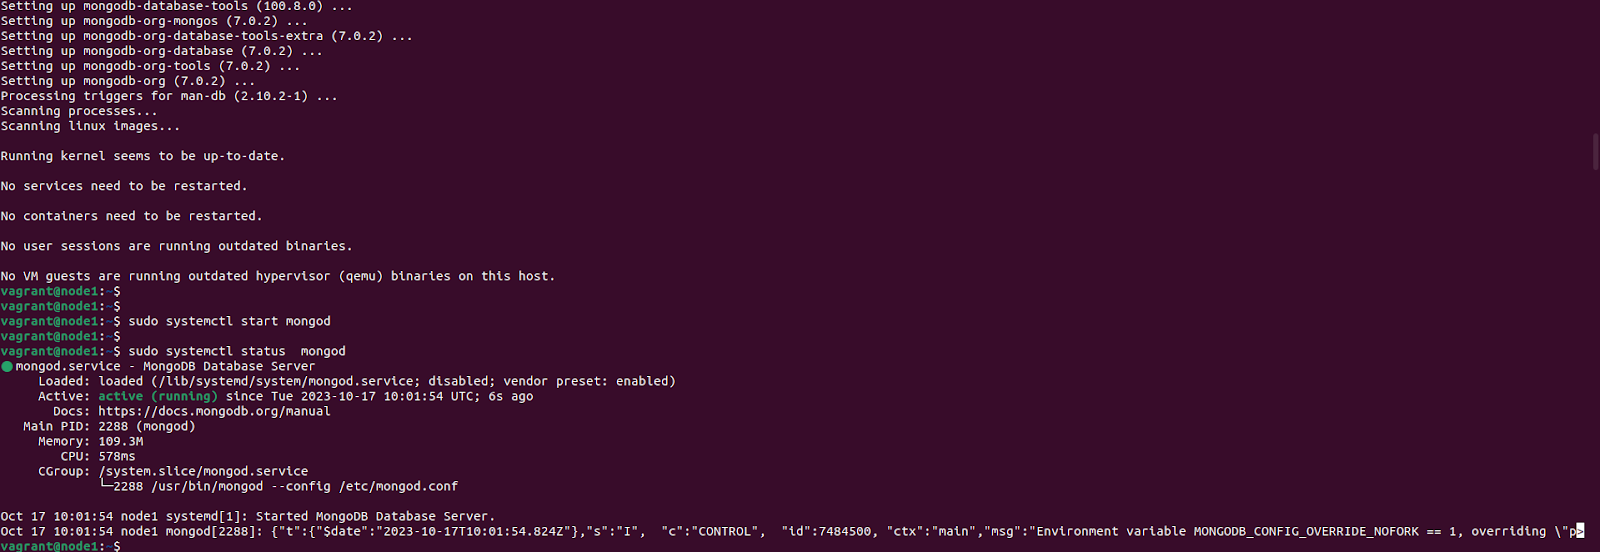
2. Configure the /etc /hosts and /etc /mongod.conf file
By default mongodb keeps the configuration file is in /etc/mongod.conf. Open the the file using vi editor and change the bind address using the bind_IP and enable the replication(remove the comment(#) key) and add a replica set name using the “replSetName” option.Here added the replSetName like ‘rep’, see the below screenshot.
> sudo vi /etc/mongod.confreplication:
replSetName: "rep"
Open the /etc/hosts file and add these lines and save it
> sudo vi /etc/hosts

 192.168.56.10 mongodb1
 192.168.56.20 mongodb2
3. Configure the firewall
First we have to check the status of firewall,If it is disable we can enable it and allow the mongodb default port 27017.
> sudo ufw status
> sudo ufw enable
> sudo ufw allow 27017
Follow the above steps for setup the other node for replication.
4. Configure the replication set
We have to configure the replication set using the /etc/mongod.conf file.After that, restart the all MongoDB server and login to the primary node using the mongo shell utility.
> sudo systemctl restart mongod
> sudo mongosh 192.168.56.10
5.Initiate the replication
To initiate the replication using the rs.initiate() method.
mongosh > rs.initiate()
After the initialization we have to add the other nodes using the rs.add () method.
mongosh > rs.add(“ 192.168.56.20:27017”) // Here pass the ip address and the port number.
Replication status
To check the replication status using the rs.status() method.
mongosh > rs.status()
6.Testing the replication
Create a new database and check it with the secondary.
Primary:
Here create a new database ‘demo’ creating the use command.
mongosh > use demo
Secondary :
Successfully replicate the demo database on secondary node.

Create a new collection :
Create a new collection ‘test’ on primary.
Primary
mongosh > use demo
mongosh > db.createCollection("test")
mongosh > show collections
Secondary

Insert some data to the collection:
Primary
mongosh > db.test.insertOne({id:1,name:"sarath"})
Successfully inserted the data to the collection from primary and checked it with the secondary,But unfortunately got an error,

The error shows can’t set the read preference.
To Fix the error – Need to set the read preference
mongosh > db.getMongo().setReadPref(‘secondary’)
Conclusion
MongoDB replication is a powerful feature that provides high availability, data redundancy, and load balancing for database read operations. In this blog, we explored the core concepts of MongoDB replication, its components like the op-log, heartbeat mechanism, and replication types such as replica sets and sharded clusters. I hope that it’s very useful for the beginners when configuring the replication. Stay tuned for more blogs.